INTRO
To be honest I only wanted a Raspberry Pi to act as simple web server so that I could practice network communication with my iOS apps. However, I soon learnt that they are a lot of fun and got very side tracked. I decided to make a temperature sensor that my app could communicate with using a web server. There are lots of tutorials that I used to make this happen but hopefully this will show every part in detail so its easy to understand. I will cover:
1 – Setting up the Maxim DS18B20+ temperature sensor and writing a Python script to read the sensor
2 – Setup of LAMP. Linux, Apache, MySQL & PHP for the webserver + Writing the values from the temp sensor to the MySQL database
3 – Writing PHP scripts to access the MySQL database from a web browser
4 – Outputting the results as JSON for a mobile app to read.
5 – An simple iOS app to read our temp sensor values and display them
All of the source code can be found in my Github Repo.
There are no prerequisites to this other than knowing how to install Raspbian onto a Raspberry Pi and using SSH to access the Pi over your home network (I’m using Terminal on mac but Putty on windows will work fine). It isn’t necessary to SSH but I prefer to use it. This guide will work perfectly well with a Pi setup with a monitor and keyboard.
WIRING UP
So as promised lets set up our Pi for the temperature sensor and write a Python script to read the temperature from it. We will use GPIO pin 4 as it is the default Pi pin for 1-wire comms, which the temperature sensor uses to communicate. All comms are sent via this wire to our Pi in the form of a unique serial number for the sensor and a temperature reading. Because of this unique serial number we can even have more than one device on the same GPIO but one step at a time.
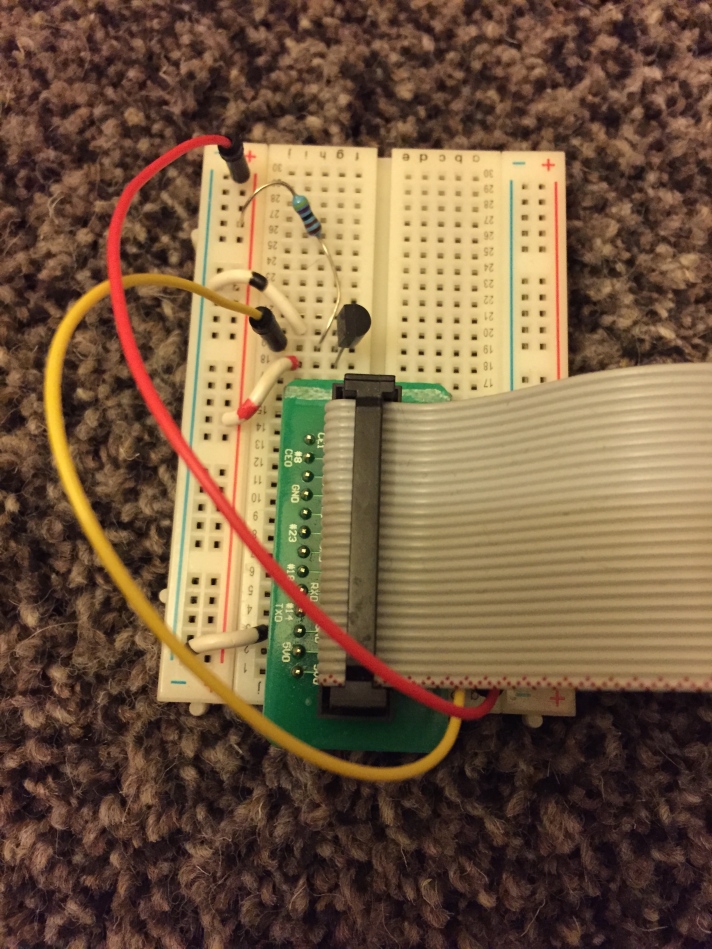
Set up your Pi and DS18B20+ as below. The wiring is fairly simple, just a 3.3V supply voltage, ground and data. There is a 10K pull up resistor from Vdd to data just so the pin isn’t floating.
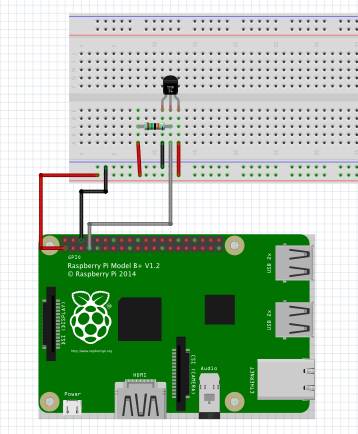
Heres mine:
READING THE TEMPERATURE SENSOR
Put a fresh install of Raspbian onto your Pi, connect it to your local network via the Ethernet cable and turn it on. Now SSH into your Pi using Terminal and enter the password.
***If for some reason when attempting to access the Pi via SSH after booting up your Pi with a fresh Raspbian install you get an RSA key warning just type this into your terminal to delete all stored RSA tokens. ***
rm -f ~/.ssh/known_hosts
We need to load the drivers for the 1-wire comms and the temp sensor into the Pi kernel. Modprobe is a Linux program to add a loadable kernel into the Linux kernel. In your terminal enter:
sudo modprobe w1-gpio
sudo modprobe w1-therm
Now change your working directory (cd) to:
cd /sys/bus/w1/devices/
This is where the devices running on the 1-wire will be. So to find our newly created device just list the contents of the directory with ls.
ls
Now you should see something listed like
28-00000622fd44 w1_bus_master1
This is the serial number for the device. To interrogate that device we need to go into its directory. Make sure you use the serial number of your own sensor!!
cd 28-00000622fd44
The sensor writes to a file called w1_slave so if we just read that file we can now finally know what temperature it is. Enter:
cat w1_slave
cat simply displays the contents of a file. BTW this documentation may come in handy if some of these commands are new.
You will get the following output:
0b 01 4b 46 7f ff 05 10 a8 : crc=a8 YES
0b 01 4b 46 7f ff 05 10 a8 t=16687
The second line shows the temp “t = xxxxx” in degrees Celsius. This may seem high but that’s because you need to format the data, as the value for t is the temperature to 3dp. So read it as t = xx.xxx . For example 16.687. Yes it is cold in here!
Now this is great and all but it’s a bit on the laborious side so lets write a Python script to do all of the hard work for us.
WRITING A PYTHON SCRIPT TO GET THE TEMPERATURE
Go back to the root directory and make a new directory (mkdir) called tempLog.
cd
mkdir tempLog
Go into the new directory and create a new python file in nano.
cd tempLog
sudo nano getTemp.py
Copy the code below taking care to use your own value for the sensor. Explanation beneath the code.
import os
import time
import datetime
import glob
from time import strftime

os.system('modprobe w1-gpio')
os.system('modprobe w1-therm')
temp_sensor = '/sys/bus/w1/devices/28-00000622fd44/w1_slave'

def tempRead():
        t = open(temp_sensor, 'r')
        lines = t.readlines()
        t.close()

        temp_output = lines[1].find('t=')
        if temp_output != -1:
                temp_string = lines[1].strip()[temp_output+2:]
                temp_c = float(temp_string)/1000.0
        return round(temp_c,1)

while True:
    temp = tempRead()
    print temp
    datetimeWrite = (time.strftime("%Y-%m-%d ") + time.strftime("%H:%M:%S"))
    print datetimeWrite
    break
We first import all of the Python libraries we need. We then load the gpio and therm kernels again using modprobe. Rather than write it out again and again we also use a variable to store our path to the sensor’s w1_slave file, I called it temp_sensor.
A method called tempRead is defined. In this method we read in the w1_slave file using open ‘r’. The file is then converted in to an array of strings called ‘lines’ using readlines.
If you remember it is the second line of the w1_slave file that contains the temperature so we search lines[1] using find for “t=”. Which will give us an index value of where that string occurs. If the returned value from that find is not -1(which means it didn’t find it) we then strip out the temperature reading as a string from the index where “t=” was +2 to the end of the line. If you didn’t +2 you would get “t=xxxxx” as the temperature, we want “xxxxx”.
Then the string is converted to a float, divided by 1000 to put the temperature into proper format of xx.xxx and then returned to the while loop.
When the script is run the first thing it does is go to the while loop. Here it will call our previously defined method tempRead to get the value of the sensor. It will then print the value to the output. Then just to make things look a bit nicer it gets the current date and time and prints it out on the output one line below. Break then stops the while loop and ends the script. I used a while loop so that if you wish you can remove break and insert time.sleep(10) for example so that the temperature and current date and time is output every 10 seconds.
Hopefully that all makes sense. Close the nano file by pressing ctrl and x. It will prompt you to save, press y to confirm writing and the filename.
Now lets give it a go. While still in the tempLog directory enter:
sudo python readTemp.py
You will get something like this:
pi@raspberrypi ~/tempLog $ sudo python readTemp.py
16.4
2014-12-24 11:51:08
We now have the basic workings of our temperature sensor and logger setup. In part 2 we will set up the web server and MySQL table for our data.
The “ls” command is not working when I try to use it. It does nothing when I enter it in.
Presumably it works when you try it in other folders, so it lists the files contained in the current directory? It may be that your temperature sensor is not conected correctly, therefore not showing up in the 1-wire devices directory.
Could it be the Flavor of Raspbian that I am using? I am using Jesse. Do I need to enable/disable any special features or anything like that? Sorry, I am completely new to this.
Possibly. I would get to grips with the operating system first so you can do basic operations like ls, cd, rm etc. There are many tutroials out there to get started. Otherwise you may find this an uphill struggle. Good luck and keep trying!
Hi,
Great tutorial, my fix for this was:
1) “cd” to home directory
2) “sudo nano /boot/config.txt”
3) add “dtoverlay=w1-gpio”, save and exit
4) Reboot
Cheers,
Hi,
Finding this tutorial very useful! I see the comment above has the same issue as I had; “ls” not working within “cd /sys/bus/w1/devices/”. I found this fix for me on another forum.
1) “cd” to your home directory
2) “sudo nano /boot/config.txt”
3) add in “dtoverlay=w1-gpio”, save and exit
4) Do a reboot and off we go!
This is a great starter project, well documented. Im up too Part 2, with this being my only stumbling block so far.
Thanks
Great tutorial. Nicely presented and explained.
Many thanks.
i added this line to the code
if temp_output != -1:
temp_string = lines[1].strip()[temp_output+2:]
temp_f = ((float(temp_string)/1000.0)*1.8+32)
temp_c = float(temp_string)/1000.0
return round(temp_f,1),,round(temp_c)
It will print out the temp out in Fahrenheit and Celsius
You can also run:
watch python getTemp.py
this will keep running the script and give you a version of the program that runs until you hit ctrl+c
How to connect a wireless sensor to Raspberry Pi and retrieve data?
0b 01 4b 46 7f ff 05 10 a8 : crc=a8 YES
0b 01 4b 46 7f ff 05 10 a8 t=16687
In the above output from w1_slave what is this data at the front?
0b 01 4b 46 7f ff 05 10 a8
0b 01 4b 46 7f ff 05 10 a8
Getting the date and time from the system clock may not represent the actual time when the temp was measured and recorded in the file.
Anyway to get the actual date/time when the sensor read and recorded the temp?
Thanks
MMJ
Take the time as a new column in the database along with your reading.
Hi, What needs to be done if we use lm35+adc (mcp3008) instead of DS18B20 in above code
Hi Harry, I have been using this guide for a year or so and have been finding and fixing the errors for my students. I am wondering how you feel about me creating a new blog on my website that modifies your guide with all of the issues fixed. I will obviously link back here to acknowledge your work. Let me know.
Hi David,
Yeah that’s fine, glad you have found the article useful!
Thanks, I’ll let you know when it’s up. Thanks so much for getting me started by the way.
2 Pingbacks
Recent Posts
Archives
Recent Comments
Categories
Meta
Recent Posts
Recent Comments
Archives
Categories
Meta