Swift Arrays – Basic forEach, map & filter — July 10, 2016

Swift Arrays – Basic forEach, map & filter


I have been using Swift for quite a long while now but while trying to explain parts of it I was trying to make simple little demos of how our lives can be made easier by using the functional aspects of the language. Starting simple lets start by making an array for the ages of some people etc

var ages = [12, 54, 13, 76, 86, 34]


What if we wanted the ages in months? We could iterate over ages and multiply each element by 12

var agesMonths: [Int] = []

for age in ages{
	agesMonths.append(age * 12)
}


Alternatively we could use the forEach function on the people array. This function essentially shortens the syntax for a for in loop by taking a function as an argument and then applying it to each element in the array in index order. This does not replace the for in loop, as that has its place, for example when using continue as that is not permitted for this function.

var agesMonths1: [Int] = []
ages.forEach({agesMonths1.append($0 * 12)})


Incase you didn’t already know $0 is shorthand for the passed in parameter to the function. In this case it will be the Int from whichever index of the array is being iterated over. A great example of how a function can be reduced down to this level is in the Apple Swift docs here.

If we didn’t want to make a new array and just transform the elements of the original array we could use map. Map allows us to pass a function as an argument which will again be performed on each element of the array, allowing for each element to be transformed by our passed in function. In this case each element will be multiplied by 12. The difference being though that the result of the map function returns a new array consisting of the newly transformed elements.

ages = ages.map({$0 * 12})


Perhaps a slightly more complex example. We will make a struct Person that will have four properties.

struct Person{
	var firstName: String
	var lastName: String
	var age: Int
	var weight: Float
}

let person1 = Person.init(firstName: "Harry", lastName: "Goodwin", age: 28, weight: 10.2)
let person2 = Person.init(firstName: "Jessica", lastName: "Joop", age: 35, weight: 9.3)
let person3 = Person.init(firstName: "Mark", lastName: "Master", age: 22, weight: 10.2)
let person4 = Person.init(firstName: "Xavier", lastName: "Brand", age: 44, weight: 13.3)

var people: [Person] = [person1, person2, person3, person4]

So lets try and transform some array elements! Perhaps we wanted all of names to be uppercase? Why not make a function to do it for us that we can pass as an argument to the map function.

func personNamesUppercase(person: Person) -> Person{
	var newPerson = person
	newPerson.firstName = person.firstName.uppercaseString
	newPerson.lastName = person.lastName.uppercaseString
	
	return newPerson
}

let peopleCapitalised = people.map(personNamesUppercase)


Now lets print out all of the first and last names

peopleCapitalised.forEach{
	print($0.firstName)
}


The weights are currently in imperial measurement (stone), so lets use map again to convert them to metric (kg).

func convertWeight(person: Person) -> Person{
	var newPerson = person
	newPerson.weight = person.weight * 6.35029
	
	return newPerson
}

let peopleMetricWeight = people.map(convertWeight)

peopleMetricWeight.forEach{
	print($0.weight)
}


What is really cool though is that we can chain map function so we can make the names uppercase and convert the weights all in one statement

let peopleUpperCaseMetric = people.map(personNamesUppercase).map(convertWeight)

Now lets take a look at some other useful functions we can use. What if we wanted to have an array of people under 30?

let underThirties = people.filter{$0.age < 30}
print(underThirties.count)

Or perhaps people 30 or over and weighing more than 60kg. For this we will need to use the function we created earlier to convert the weights to metric and then apply a filter on age and weight.

let overThirtyover10kg = people.map(convertWeight).filter{$0.age >= 30 && $0.weight > 60}
print(overThirtyover10kg.count)

There is a playground with all of the examples on Github.

I really like the syntax for passing in functions in Swift, although it took me quite a long time to really get it never having come across it in any functional languages etc. But seeing how clean code can be made above I think it is definitely worth taking a look at.

Bullet Point List – iOS Swift — April 10, 2016
Get List Of BLE Devices Using CoreBluetooth On iOS – Swift — January 21, 2016
Blurring a UIView (Animated) — December 18, 2015
Easy Expanding/Collapsing TableViewCells — November 6, 2015

Easy Expanding/Collapsing TableViewCells

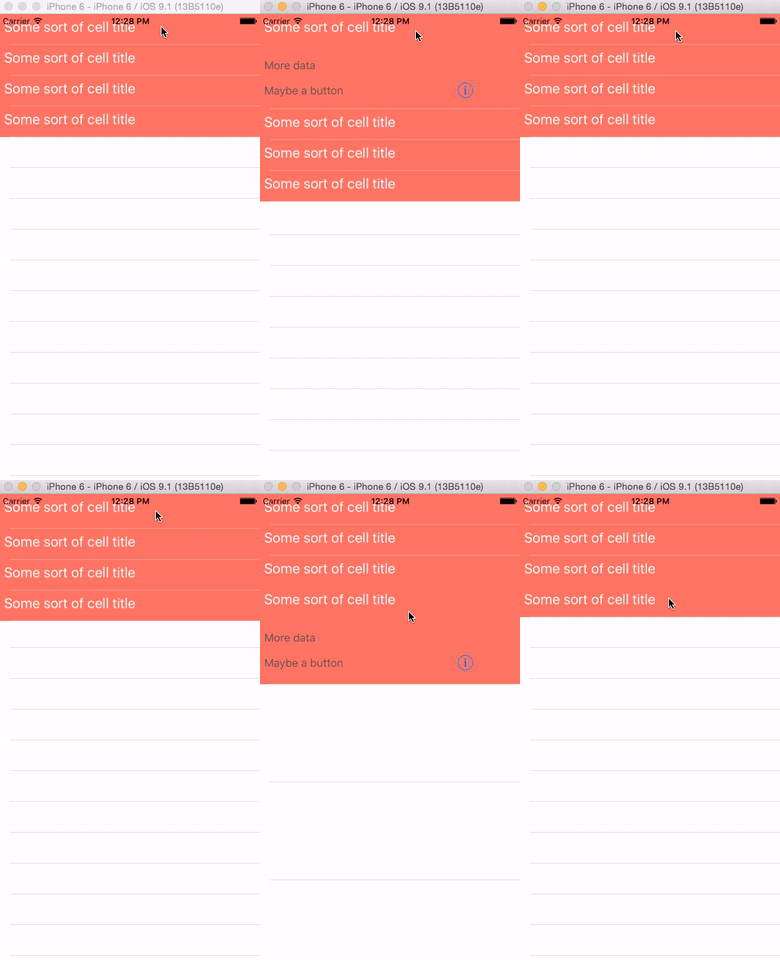
I noticed when using an app the other day that its UITableViewCells were increasing in size when touched, with the height increase also animated. I thought this would be quite difficult to achieve but after digging around it turns out that its quite simple. By the end of this quick post we will have something like the below.

giphy

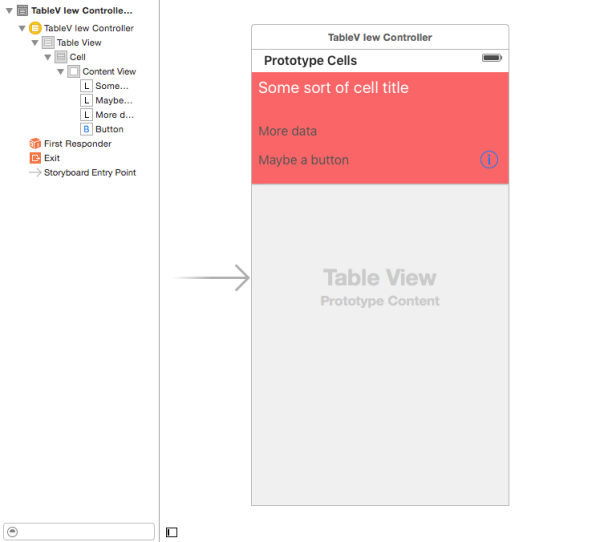
Start by creating a new single view project in Swift. Navigate to the storyboard view and change the default UIViewController for a UITableViewController. Then create a new prototype cell that is 140 points in height. Place the label you want visible when the cell is small in height (44 points) and then place some labels and buttons below. The latter views will be visible when the cell has been touched.

Screen Shot 2015-11-06 at 12.39.55

Create a new class called TableViewController and paste the code beneath inside it.

import UIKit

class TableVIewController: UITableViewController
{
    var selectedCellIndex = -1
    
    override func tableView(tableView: UITableView, cellForRowAtIndexPath indexPath: NSIndexPath) -> UITableViewCell
    {
        return tableView.dequeueReusableCellWithIdentifier("Cell")!
    }
    
    override func tableView(tableView: UITableView, heightForRowAtIndexPath indexPath: NSIndexPath) -> CGFloat
    {
        return (indexPath.row == selectedCellIndex) ? 140 : 44
    }
    
    override func tableView(tableView: UITableView, didSelectRowAtIndexPath indexPath: NSIndexPath)
    {
	selectedCellIndex =  (selectedCellIndex == indexPath.row) ? -1 : indexPath.row

        self.tableView.beginUpdates()
        self.tableView.endUpdates()
    }
    
    override func tableView(tableView: UITableView, numberOfRowsInSection section: Int) -> Int
    {
        return 4
    }
}

Add the new TableViewController to the UITableViewController in the Storyboard using the Identity Inspector and hit run. Select a row and its size should increase with a nice animation. So how does this work?

BeginUpdates and endUpdates allows you to make changes to the tableView, such as inserting and deleting rows without needing to call for a reload. To make this process look nicer to the user it is animated. Although we don’t perform any insertions/deletions between beginUpdates and endUpdates the animation is still triggered as well as heightForRow, where we set the new height of the selected row.

If you don’t want the animation to happen just do this

UIView.setAnimationsEnabled(false)
self.tableView.beginUpdates()
self.tableView.endUpdates()
UIView.setAnimationsEnabled(true)
Sorting Arrays – Objective C — August 24, 2015

Sorting Arrays – Objective C

Using arrays is a staple of iOS development and there many tools at our disposal to do all manor of things with them. Below are some that I use often and find quite useful.

Sorting simple arrays of strings and numbers

NSArray *names = @[@"Harry", @"George", @"Xavier", @"Adam", @"Michael", @"Tim"];
NSArray *sortedNameArray = [names sortedArrayUsingSelector:@selector(compare:)];

for (NSString *name in sortedNameArray)
{
    NSLog(@"%@", name);
}

Which will print out:
2015-08-16 17:39:08.137 ArrayTEST[24935:755443] Adam
2015-08-16 17:39:08.138 ArrayTEST[24935:755443] George
2015-08-16 17:39:08.138 ArrayTEST[24935:755443] Harry
2015-08-16 17:39:08.138 ArrayTEST[24935:755443] Michael
2015-08-16 17:39:08.138 ArrayTEST[24935:755443] Tim
2015-08-16 17:39:08.139 ArrayTEST[24935:755443] Xavier

Luckily this will also work with NSNumbers. Also notice that in this example I have reversed the sort order by adding reverseObjectEnumerator.

NSArray *ages = @[@34.3, @45, @67.2, @12, @23, @74];
		NSArray *sortedAgesArray = [[[ages sortedArrayUsingSelector:@selector(compare:)] reverseObjectEnumerator] allObjects];
		
for (NSNumber *age in sortedAgesArray)
{
    NSLog(@"%@", name);
}

2015-08-16 17:39:08.139 ArrayTEST[24935:755443] 74
2015-08-16 17:39:08.139 ArrayTEST[24935:755443] 67.2
2015-08-16 17:39:08.139 ArrayTEST[24935:755443] 45
2015-08-16 17:39:08.139 ArrayTEST[24935:755443] 34.3
2015-08-16 17:39:08.140 ArrayTEST[24935:755443] 23
2015-08-16 17:39:08.140 ArrayTEST[24935:755443] 12

What would happen though if our array of strings had a mix of cases?

NSArray *names = @[@"Harry", @"George", @"Xavier", @"adam", @"michael", @"tim"];
NSArray *sortedNameArray = [names sortedArrayUsingSelector:@selector(compare:)];
	
for (NSString *name in sortedNameArray)
{
    NSLog(@"%@", name);
}

Here is the output
2015-08-16 17:53:49.929 ArrayTEST[25007:767608] George
2015-08-16 17:53:49.931 ArrayTEST[25007:767608] Harry
2015-08-16 17:53:49.931 ArrayTEST[25007:767608] Xavier
2015-08-16 17:53:49.931 ArrayTEST[25007:767608] adam
2015-08-16 17:53:49.931 ArrayTEST[25007:767608] michael
2015-08-16 17:53:49.931 ArrayTEST[25007:767608] tim

Well they are ordered but not how I wanted. Notice the order of precedence here, uppercase letters are ordered then lowercase. If we wanted to order the array disregarding case we can use localizedCaseInsensitiveCompare.

NSArray *names = @[@"Harry", @"George", @"Xavier", @"adam", @"michael", @"tim"];
NSArray *sortedNameArray = [names sortedArrayUsingSelector:@selector(localizedCaseInsensitiveCompare:)];
	
for (NSString *name in sortedNameArray)
{
    NSLog(@"%@", name);
}

Giving us the output:
2015-08-16 18:02:43.434 ArrayTEST[25022:774253] adam
2015-08-16 18:02:43.435 ArrayTEST[25022:774253] George
2015-08-16 18:02:43.435 ArrayTEST[25022:774253] Harry
2015-08-16 18:02:43.435 ArrayTEST[25022:774253] michael
2015-08-16 18:02:43.435 ArrayTEST[25022:774253] tim
2015-08-16 18:02:43.435 ArrayTEST[25022:774253] Xavier


Sorting Arrays by Object Properties

For an example I am making a class called Developer that will have three properties; name (string), age (NSNumber), platform (string). The code below will generate 6 developer objects, add them to a NSMutableArray named Developers and print them out in the original order of the array.

#import <Foundation/Foundation.h>

@interface Developer: NSObject

@property (nonatomic, strong) NSString *name;
@property (nonatomic, strong) NSString *lastName;
@property (nonatomic, strong) NSString *platform;
@property (nonatomic, strong) NSNumber *age;

@end

@implementation Developer
@end

int main(int argc, const char * argv[])
{
	@autoreleasepool
	{
		NSArray *names = @[@"Harry", @"Adam", @"Xavier", @"Steve", @"Adam", @"Michael", @"Tim"];
		NSArray *lastNames = @[@"Smith", @"Jackson", @"Cameron", @"Atlee", @"Bevin", @"Potter", @"Cortez"];
		NSArray *platforms = @[@"iOS", @"iOS", @"Android", @".Net", @"Android", @"Tizen", @"iOS"];
		NSArray *ages = @[@34.3, @45, @67.2, @12, @23, @74, @32];
		
		NSMutableArray *developers = [[NSMutableArray alloc] init];
		for (NSInteger i = 0; i < [names count]; i++)
		{
			Developer *developer = [[Developer alloc] init];
			developer.name = names[i];
			developer.lastName = lastNames[i];
			developer.age = ages[i];
			developer.platform = platforms[i];
			
			[developers addObject:developer];
		}
		
		for (Developer *developer in developers)
		{
			NSLog(@"%@ %@, %@, %@",developer.name, developer.lastName, developer.platform, developer.age);
		}
	}
	
    return 0;
}

Giving us
2015-08-16 19:23:46.898 ArrayTEST[25222:819170] Harry Smith, iOS, 34.3
2015-08-16 19:23:46.899 ArrayTEST[25222:819170] Adam Jackson, iOS, 45
2015-08-16 19:23:46.899 ArrayTEST[25222:819170] Xavier Cameron, Android, 67.2
2015-08-16 19:23:46.900 ArrayTEST[25222:819170] Steve Atlee, .Net, 12
2015-08-16 19:23:46.900 ArrayTEST[25222:819170] Adam Bevin, Android, 23
2015-08-16 19:23:46.900 ArrayTEST[25222:819170] Michael Potter, Tizen, 74
2015-08-16 19:23:46.900 ArrayTEST[25222:819170] Tim Cortez, iOS, 32

So if we wanted to sort our array by name how would we do it? How about NSSortDescriptor? To do this we simply get an object of NSSortDescriptor and tell it what property we are sorting by in string form and if we want our data sorted in ascending order or not. Simple

NSSortDescriptor *sortDescriptor = [[NSSortDescriptor alloc] initWithKey: @"name" ascending: YES];
		NSArray *sortedDevelopers = [developers sortedArrayUsingDescriptors: [NSArray arrayWithObject:sortDescriptor]];
		
		for (Developer *developer in sortedDevelopers)
		{
			NSLog(@"%@ %@, %@, %@",developer.name, developer.lastName, developer.platform, developer.age);
		}

Which will give us the following
2015-08-16 19:24:23.626 ArrayTEST[25230:819624] Adam Jackson, iOS, 45
2015-08-16 19:24:23.627 ArrayTEST[25230:819624] Adam Bevin, Android, 23
2015-08-16 19:24:23.627 ArrayTEST[25230:819624] Harry Smith, iOS, 34.3
2015-08-16 19:24:23.627 ArrayTEST[25230:819624] Michael Potter, Tizen, 74
2015-08-16 19:24:23.628 ArrayTEST[25230:819624] Steve Atlee, .Net, 12
2015-08-16 19:24:23.628 ArrayTEST[25230:819624] Tim Cortez, iOS, 32
2015-08-16 19:24:23.628 ArrayTEST[25230:819624] Xavier Cameron, Android, 67.2

Well its a start but look at the two Adams, their last names are not in alphabetical order. That is because we are only sorting by name and not lastName. Luckily the NSArray method sortedArrayUsingDescriptors can take an array of NSSortDescriptor to sort our data. Lets try again.

NSSortDescriptor *sortDescriptor = [[NSSortDescriptor alloc] initWithKey: @"name" ascending: YES];
		NSSortDescriptor *secondSortDescriptor = [[NSSortDescriptor alloc] initWithKey: @"lastName" ascending: YES];
		NSArray *sortedDevelopers = [developers sortedArrayUsingDescriptors: [NSArray arrayWithObjects:sortDescriptor, secondSortDescriptor, nil]];
		
		for (Developer *developer in sortedDevelopers)
		{
			NSLog(@"%@ %@, %@, %@",developer.name, developer.lastName, developer.platform, developer.age);
		}

2015-08-16 19:29:52.785 ArrayTEST[25243:822769] Adam Bevin, Android, 23
2015-08-16 19:29:52.786 ArrayTEST[25243:822769] Adam Jackson, iOS, 45
2015-08-16 19:29:52.786 ArrayTEST[25243:822769] Harry Smith, iOS, 34.3
2015-08-16 19:29:52.786 ArrayTEST[25243:822769] Michael Potter, Tizen, 74
2015-08-16 19:29:52.787 ArrayTEST[25243:822769] Steve Atlee, .Net, 12
2015-08-16 19:29:52.787 ArrayTEST[25243:822769] Tim Cortez, iOS, 32
2015-08-16 19:29:52.787 ArrayTEST[25243:822769] Xavier Cameron, Android, 67.2

Lets try one more. Why not order our developers by what platform they work on and then by age?

NSSortDescriptor *sortDescriptor = [[NSSortDescriptor alloc] initWithKey: @"platform" ascending: YES];
		NSSortDescriptor *secondSortDescriptor = [[NSSortDescriptor alloc] initWithKey: @"age" ascending: YES];
		NSArray *sortedDevelopers = [developers sortedArrayUsingDescriptors: [NSArray arrayWithObjects:sortDescriptor, secondSortDescriptor, nil]];
		
		for (Developer *developer in sortedDevelopers)
		{
			NSLog(@"%@ %@, %@, %@",developer.name, developer.lastName, developer.platform, developer.age);
		}

2015-08-16 19:35:25.610 ArrayTEST[25256:827191] Steve Atlee, .Net, 12
2015-08-16 19:35:25.611 ArrayTEST[25256:827191] Adam Bevin, Android, 23
2015-08-16 19:35:25.612 ArrayTEST[25256:827191] Xavier Cameron, Android, 67.2
2015-08-16 19:35:25.612 ArrayTEST[25256:827191] Michael Potter, Tizen, 74
2015-08-16 19:35:25.612 ArrayTEST[25256:827191] Tim Cortez, iOS, 32
2015-08-16 19:35:25.612 ArrayTEST[25256:827191] Harry Smith, iOS, 34.3
2015-08-16 19:35:25.612 ArrayTEST[25256:827191] Adam Jackson, iOS, 45

A third argument can be used when initiaising NSSortDescriptor, which allows a selector to be used to perform the comparison, for example caseInsensitiveCompare and localizedStandardCompare. We used the former earlier on to sort our names disregarding letter case, the latter should be used when dealing with strings that a user will see, as it takes into account localisation language features.

For example to add the caseInsensitiveCompare you would use:

NSSortDescriptor *sortDescriptor = [[NSSortDescriptor alloc] initWithKey:@"name" ascending:YES selector:@selector(caseInsensitiveCompare:)];

Pretty useful!
 

IBInspectable and IBDesignable – Swift — June 24, 2015

IBInspectable and IBDesignable – Swift

When making views in Xcode Storyboards it can be frustrating not being able to see any work you have done using code or not being able to change run time attributes like corner radiuses. For the latter you could use User Defined Runtime Attributes but there is no auto-complete so errors are likely and personally I don’t find it that friendly.

Fortunately, Xcode has some added features to allow us to see what views we are working on in real time and to be able to change run time values very easily, all in Storyboards.

So to get started create a new Swift single view application and add a new UIView to the empty View Controller. Make it fill most of the View Controller.

Screen Shot 2015-06-23 at 21.11.13


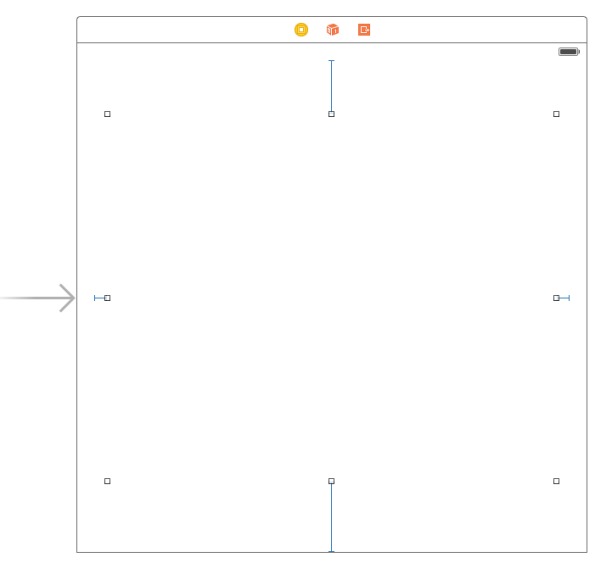
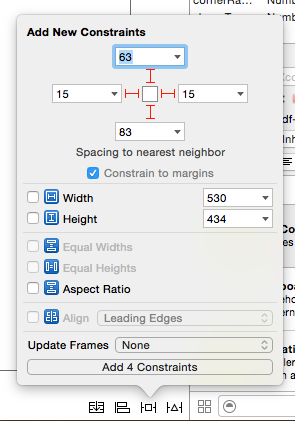
Add some basic constraints (this way it doesn’t matter what your target device is).

Screen Shot 2015-06-23 at 21.12.21


Now make a new Swift class that subclasses UIView and add the below to it.

import UIKit

@IBDesignable class TestView: UIView
{
	@IBInspectable var viewBackgroundColor: UIColor?
	{
		didSet
		{
			layer.backgroundColor = viewBackgroundColor?.CGColor
		}
	}

	@IBInspectable var cornerRadius: CGFloat = 0
	{
		didSet
		{
			layer.cornerRadius = cornerRadius
		}
	}
}

There is some new terminology here so lets go through that first.

@IBDesignable – This tells Xcode that the view is to be rendered in the Storyboard editor, so there is no need to keep building and running the project to see simple view changes.

@IBInspectable – Allows us to access the property from the Attribute Inspector when the view is highlighted.

The rest of the code is simply creating two new properties,viewBackgroundColour and cornerRadius. We then use didset to change the view’s corresponding properties when either cornerRadius or viewBackgroundColour are changed.

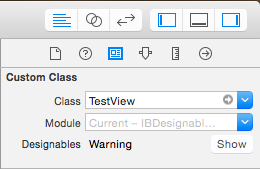
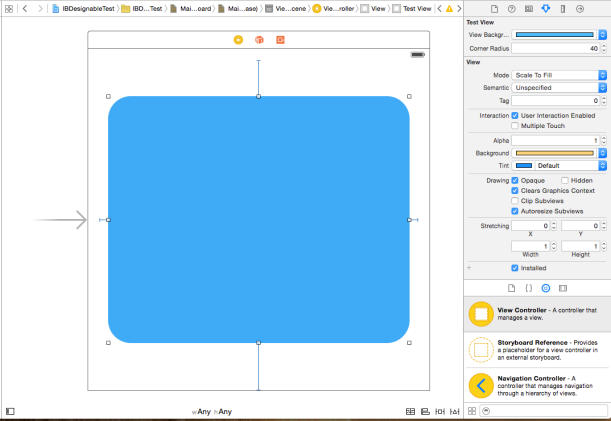
Go back into your Storyboard and select the new UIView you created. Open the Identity Inspector and set the UIView’s class to be your new view class, in this case TestView.
Screen Shot 2015-06-23 at 21.11.39


Open the Attribute Inspector and you should be greeted by two new attributes at the top of the Attributes view window. Change either of the attributes and you should see the view change to match the changes almost immediately.

Screen Shot 2015-06-23 at 21.13.33


Good but it could do more. Make a new Swift class called ShapeView and copy the below code into it.

import UIKit

class ShapeView: UIView
{
	var shapeColor: UIColor?

	override init(frame: CGRect)
	{
		super.init(frame: frame)
		self.backgroundColor = UIColor.clearColor()
	}

	required init(coder aDecoder: NSCoder)
	{
		super.init(coder: aDecoder)
	}
}


This new class is going to be a base class for some shape objects. Each subclass will implement the drawRect function and will be initialised with a frame. The only property that we will set will be the shapeColor, the background color will remain clear so the background view isn’t obscured.

Now make two further swift files like the below, which are the subclasses of ShapeView.

import UIKit

class CircleView: ShapeView
{
    override func drawRect(rect: CGRect)
	{
		let context = UIGraphicsGetCurrentContext();

		CGContextSetLineWidth(context, 5.0);
		shapeColor?.set()

		CGContextAddArc(context, (frame.size.width)/2, frame.size.height/2, (frame.size.width - 10)/2, (frame.size.height - 10)/2, CGFloat(M_PI * 2.0), 1)

		CGContextStrokePath(context);
    }
}


import UIKit

class CrossView: ShapeView
{
	override func drawRect(rect: CGRect)
	{
		let context = UIGraphicsGetCurrentContext();

		CGContextMoveToPoint(context, 0, 0)
		CGContextAddLineToPoint(context, rect.width, rect.height)
		CGContextMoveToPoint(context, rect.width, 0)
		CGContextAddLineToPoint(context, 0, rect.height)

		shapeColor?.set()
		CGContextSetLineWidth(context, 5.0);
		CGContextStrokePath(context);
	}
}


Now all we need to do is change our TestView class to add the new features.

import UIKit

@IBDesignable class TestView: UIView
{
	@IBInspectable var viewBackgroundColor: UIColor?
	{
		didSet
		{
			layer.backgroundColor = viewBackgroundColor?.CGColor
		}
	}

	@IBInspectable var cornerRadius: CGFloat = 0
	{
		didSet
		{
			layer.cornerRadius = cornerRadius
		}
	}

	@IBInspectable var shapeType: Int
	{
		set(newValue)
		{
			internalShapeType = min(newValue, 1)
			internalShapeType = max(0, internalShapeType)
		}
		get{
			return internalShapeType
		}
	}

	var internalShapeType: Int = 0

	@IBInspectable var shapeSize: CGFloat = 100.0
	@IBInspectable var shapeColor: UIColor?

	override func layoutSubviews()
	{
		let horizontalPoint: CGFloat = self.frame.width/2 - shapeSize/2
		let verticalPoint: CGFloat = self.frame.height/2 - shapeSize/2
		let shapeFrame  = CGRectMake(horizontalPoint, verticalPoint, shapeSize,shapeSize)

		let crossView = CrossView(frame: shapeFrame)
		let circleView = CircleView(frame: shapeFrame)

		let shapes = [0:crossView, 1:circleView]

		let shapeView = shapes[internalShapeType]
		shapeView!.shapeColor = shapeColor
		self.addSubview(shapeView!)
	}
}


Nothing here is that different from before except for how the shapeType variable is handled and how we change what shape is drawn.

To select which shape is used I used a dictionary with ascending integers as keys and the two shapeViews (circleView and CrossView) as objects. So depending on what the internalShapeType integer variable is set to the dictionary will return the corresponding object. But what if the integer is set above 1 or below 0?

The shapeType variable uses min and max operators in its set so that values below 0 and above 1 will not be passed to the internalShapeType. Unfortunately enums cannot be used for IBInspectable values so this is the best we can do for now.

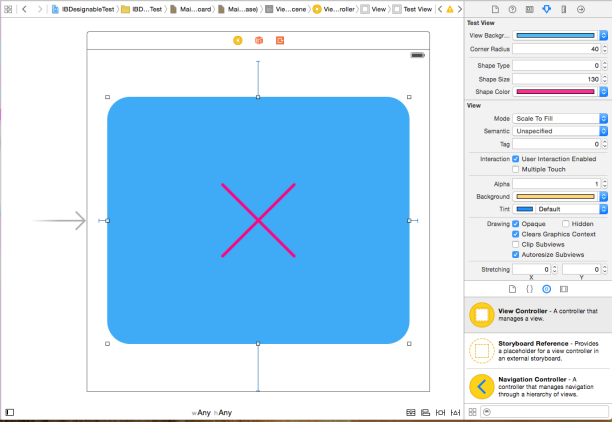
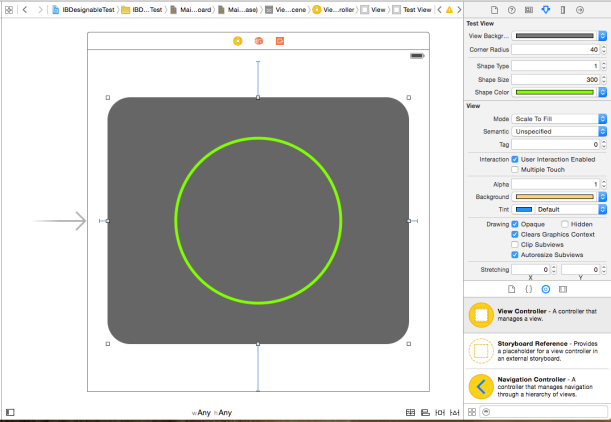
Open the Storyboard and add select the TestView. You should see the new IBInspectable properties have been added. Change them and the view will update automatically.

Screen Shot 2015-06-23 at 21.28.34
Screen Shot 2015-06-23 at 22.07.23


Raspberry Pi Temperature Sensor Web Server – Part 4 (iOS Swift App) — May 28, 2015

Raspberry Pi Temperature Sensor Web Server – Part 4 (iOS Swift App)

So we have our Raspberry Pi web server which gives us a lovely set of json temperature data. What would be great though is an app that could display this data whenever we want. So lets do just that. Once again all of the source code can be found in my Github Repo.

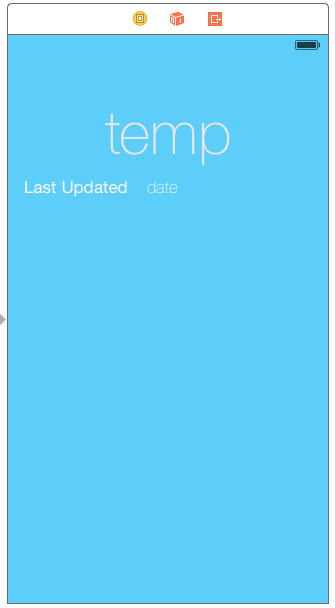
Create a new single view project in Xcode, selecting Swift as the language. Open the storyboard and add some labels to the ViewController for the temperature output and date ( I used two for the date, one just as a title). Mine is below. I disabled size classes for this.

Screen Shot 2015-05-21 at 20.37.40

Using assistant editor, ctrl drag the temp and date labels into ViewController file to create IBOutlets for UIlabels. I called mine currentTempLabel and lastUpdateLabel.

Although we could put all the code we need for this project in the VIewController it would probably be better to abstract away all of the code we will use to get the json data from the Raspberry Pi. So make a new Swift file that subclasses NSObject calledTemperatureWebService. Copy the below code into that new file, remembering to swap the IP address for yours!

import Foundation
import UIKit

protocol TemperatureWebServiceDelegate
	
{
	func temperatureReceived(temperature: String, date: String)
}

class TemperatureWebService: NSObject, NSURLConnectionDelegate
{
	
	var delegate: TemperatureWebServiceDelegate?
	
	var data = NSMutableData()
	var jsonResult: NSArray = []

	func startConnection()
	{
		let urlPath: String = "http://192.168.0.11/temperaturejson.php"
		var url: NSURL = NSURL(string: urlPath)!
		var request: NSURLRequest = NSURLRequest(URL: url)
		
		var connection: NSURLConnection = NSURLConnection(request: request, delegate: self, startImmediately: true)!
	}
	
	func connection(connection: NSURLConnection!, didReceiveData data: NSData!)
	{
		self.data.appendData(data)
	}
	
	func connectionDidFinishLoading(connection: NSURLConnection!)
	{
		var err: NSError
		jsonResult = NSJSONSerialization.JSONObjectWithData(data, options: NSJSONReadingOptions.MutableContainers, error: nil) as! NSArray
		
		getLatestTempReading()
	}
	
	func getLatestTempReading()
	{
		var dictionary: NSDictionary = jsonResult.lastObject as! NSDictionary
		var tempValue = dictionary.objectForKey("Temp") as! String
		var dateValue = dictionary.objectForKey("Date") as! String
		
		
		if (delegate != nil)
		{
			delegate?.temperatureReceived(tempValue, date: dateValue)
		}
	}
}

This class is using NSURLConnection to get the data from our web service. We provide a function startConnection() that we can call from other classes that will do as it says. It will start the NSURLConnection for our IP address. We implement the NSURLConnectionDelegate and its delegate functions – using connection to append data to our NSMutableData object and connectionDidFinishLoading to know when we have all the data and to serialise our data into JSON.

When we have the data we call getLatestTempReading() to put the last temp reading from the JSON into a dictionary and call the corresponding objects for keys for temperature and date.

I have then opted to use a delegate method to give the data back to the object that owns the TemperatureWebService object as two String objects.

Now copy the below code into your ViewController class.

class ViewController: UIViewController, TemperatureWebServiceDelegate
{
	@IBOutlet weak var currentTempLabel: UILabel!
	@IBOutlet weak var lastUpdateLabel: UILabel!
	
	override func viewWillAppear(animated: Bool)
	{
		super.viewWillAppear(animated)
		
		var webService = TemperatureWebService()
		webService.delegate = self
		webService.startConnection()
}
	
	func temperatureReceived(temperature: String, date: String)
	{
		currentTempLabel.text = "\(temperature) °C"
		lastUpdateLabel.text = "\(date)"
	}
}

As all of the hard work is done in the web service class our ViewController is incredibly simple. We firstly have two IBOutlets for our labels and then we override viewWillAppear and create a TemperatureWebService object, which we call startConnection() on. Then we implement the TemperatureWebServiceDelegate and its associated method which will be called when the web service has received data, serialised it and found the last temperature reading. We then simply set our labels to show the two strings given to us by the web service.

NOTE: If you are using iOS9 changes in App Security stop you accessing http web addresses. To fix this do what is detailed here.

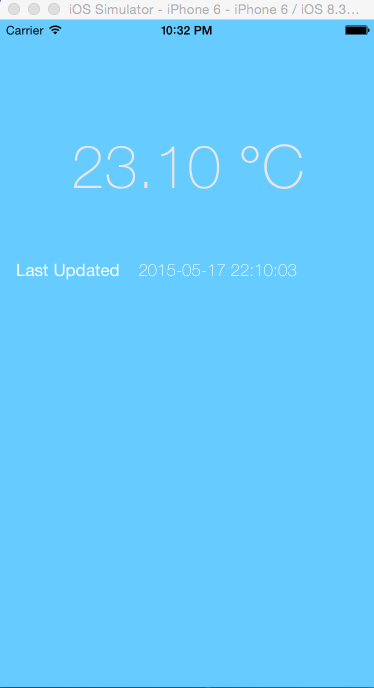
When working it should look like this.

Screen Shot 2015-05-21 at 22.31.53

Next time we will make a graph to show all of our data that has been collected.

Raspberry Pi Temperature Sensor Web Server – Part 3 (Scheduling temperature readings and PHP script) — May 18, 2015

Raspberry Pi Temperature Sensor Web Server – Part 3 (Scheduling temperature readings and PHP script)

Now wouldn’t it be nice to have our python script work autonomously, putting a temperature reading into the database every 5 minutes. To do this we will use Crontab, which is a handy unix tool to schedule jobs. A good explanation of what crontab is can be found here.

To open Crontab enter the following in your terminal.

crontab -e

Inside the Crontab file enter the following at the bottom. This simply runs our Python script every 5 minutes. If you have used different file and folder names, adjust them accordingly.

*/5 * * * * /home/pi/tempLog/readTempSQL.py

At its current state this will not work though because the readTempSQL.py script isn’t yet executable so the Cronjob will fail. To make the Python script executable, firstly enter the following at the top of the readTempSQL.py file.

#!/usr/bin/env python

This is a ‘shebang’ line, which Wikipedia will tell you “In computing, a shebang (also called a hashbang, hashpling, pound bang, or crunchbang) refers to the characters “#!” when they are the first two characters in an interpreter directive as the first line of a text file. In a Unix-like operating system, the program loader takes the presence of these two characters as an indication that the file is a script, and tries to execute that script using the interpreter specified by the rest of the first line in the file.”

Now we just need to change the file permission to executable.

sudo chmod +x readTempSQL.py

To test that the file is now executable, navigate to your tempLog directory and enter

./readTempSQL.py

The script should run and print an output to the terminal window. Congratulations the file is now executable. Check your database after 10 minutes or so to make sure your Cronjob is working as when the script is run by Crontab the output is not displayed in the terminal window.

Now lets make a php script to return our database data. Change directory to /var/www
and make a new file called temperaturejson.php.

sudo nano temperaturejson.php

Enter the following into that new file.

<?php
 
$username="root";
$password="password";
$database="temp_database";
 
mysql_connect(localhost,$username,$password);
@mysql_select_db($database) or die( "Unable to select database");
 
$query="SELECT * FROM tempLog";
$result=mysql_query($query);
 
$num=mysql_numrows($result);
 
mysql_close();
 
$tempValues = array();
 
$i=0;
while ($i < $num)
{
        $dateAndTemps = array();
        $datetime = mysql_result($result,$i,"datetime");
        $temp = mysql_result($result,$i,"temperature");
 
        $dateAndTemps["Date"] = $datetime;
        $dateAndTemps["Temp"] = $temp;
 
        $tempValues[$i]=$dateAndTemps;
        $i++;
}
 
echo json_encode($tempValues);
 
?>

This new php script gets the data from our database and then loops through the results putting them into an array where the key is either “Date” or “Temp” and the corresponding object is the result from the database.You don’t really need to give the objects keys but I think it makes it much easier when getting the data into the app. These arrays are then added to a larger array holding each reading of Date and Temp, which is then encoded into json and output using echo.

Now test this out. Using any browser go to the following address (substituting my IP for yours of course!). If you don’t get the desired output firstly check you can get to the test page on the Raspberry Pi. If you can try changing the echo to just output a string to test the page. Then check your database to make sure you actually have data to display.

http://192.168.0.11/temperaturejson.php

If all has worked correctly you will get an output similar to this

[{“Date”:”2014-12-28 17:26:20″,”Temp”:”18.90″},{“Date”:”2014-12-28 17:27:05″,”Temp”:”18.90″},{“Date”:”2014-12-28 17:27:52″,”Temp”:”18.90″},{“Date”:”2014-12-28 17:30:39″,”Temp”:”19.00″},{“Date”:”2014-12-28 17:31:02″,”Temp”:”18.90″},{“Date”:”2015-01-04 22:29:24″,”Temp”:”18.60″},{“Date”:”2015-05-14 20:56:07″,”Temp”:”21.80″},{“Date”:”2015-05-17 19:55:05″,”Temp”:”22.90″},{“Date”:”2015-05-17 19:56:17″,”Temp”:”22.90″},{“Date”:”2015-05-17 20:06:18″,”Temp”:”23.00″},{“Date”:”2015-05-17 20:47:03″,”Temp”:”23.20″}]

That is a wrap for the Raspberry Pi stuff. Now we move on to making an iOS app to do something with our data.

Centre UICollectionView Cells Horizontally iOS — May 5, 2015

Centre UICollectionView Cells Horizontally iOS

Or Centre UICollectionView Cells Horizontally iOS for US dudes.

I had to do this for a project recently so thought I would share.

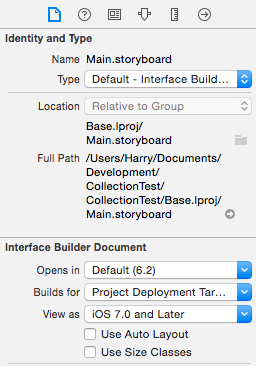
Create a single view project in Objective C and open the Storyboard. For ease of this example turn Auto Layout and Size Classes off using the iPad size for the view. This can be done in File Inspector View on the right.

Screen Shot 2015-04-28 at 21.44.02

In the general settings under Deployment info, un-tick the boxes for portrait and upside down so the app can only be displayed horizontally.

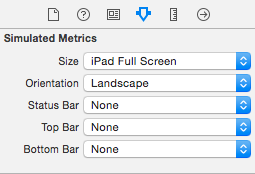
Next, setup the View Controller simulated metrics in the Attribute Inspector as follows.

Screen Shot 2015-04-28 at 21.44.25

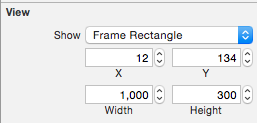
Add a UICollectionView to the ViewController and make it 1000 in width and 300 in height. Try to centre it in the middle of the View.

Screen Shot 2015-04-28 at 21.47.50


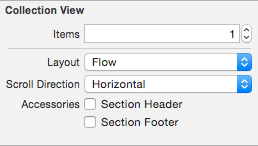
Change the scroll direction to horizontal in the Attribute Inspector for the UICollectionView. Make sure items is set to 1 while you are there so that a prototype cell stays in the collection.

Screen Shot 2015-04-28 at 21.58.06

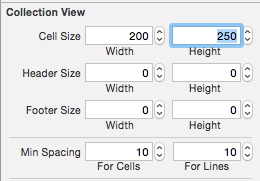
Now make the CollectionViewCell 200 in width and 250 in height

Screen Shot 2015-04-28 at 21.50.14

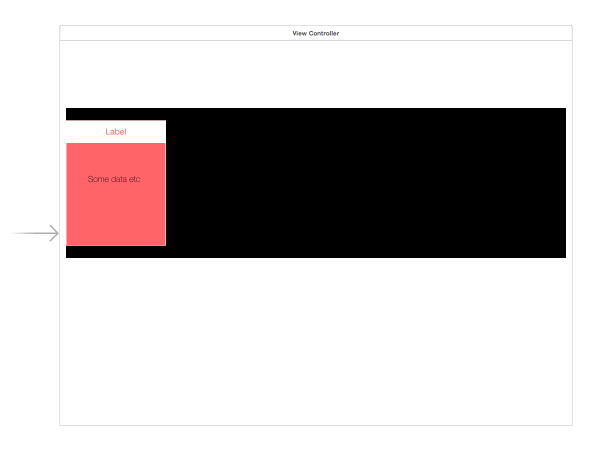
I would now add some views and labels to the default prototype cell so that what you are working with is realistic. Here is my collection View and cell.

Screen Shot 2015-04-28 at 22.01.40

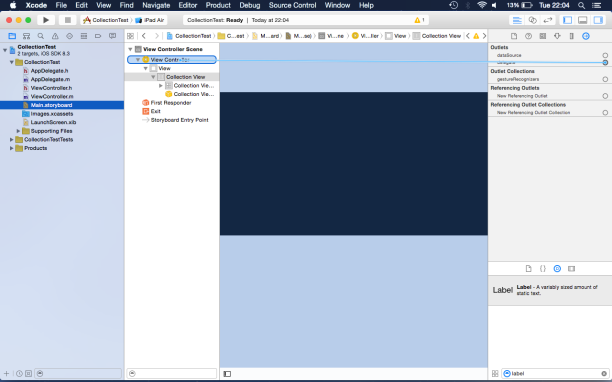
With the UICollectionView selected, go into Connections Inspector and connect the Delegate to the View Controller.

Screen Shot 2015-04-28 at 22.04.38

We need to implement the UICollectionViewDelegate. Add this to the ViewController.h


#import <UIKit/UIKit.h>

@interface ViewController : UIViewController <UICollectionViewDelegate>

@end

Now we will add two methods from the UICollectionViewDelegate. These methods will simply tell the UICollectionView how many collection cells we’re displaying and what cells to display. Pretty much the same as a tableView Delegate.

#import "ViewController.h"

@implementation ViewController
{
	NSInteger _numberOfCells;
}

- (void)viewDidLoad
{
	[super viewDidLoad];
	_numberOfCells = 3;
}

- (NSInteger)collectionView:(UICollectionView *)collectionView numberOfItemsInSection:(NSInteger)section
{

	return _numberOfCells;
}

-(UICollectionViewCell*)collectionView:(UICollectionView *)collectionView cellForItemAtIndexPath:(NSIndexPath *)indexPath
{

	UICollectionViewCell *cell = (UICollectionViewCell*)[collectionView dequeueReusableCellWithReuseIdentifier:@"Cell" forIndexPath:indexPath];

	return cell;
}

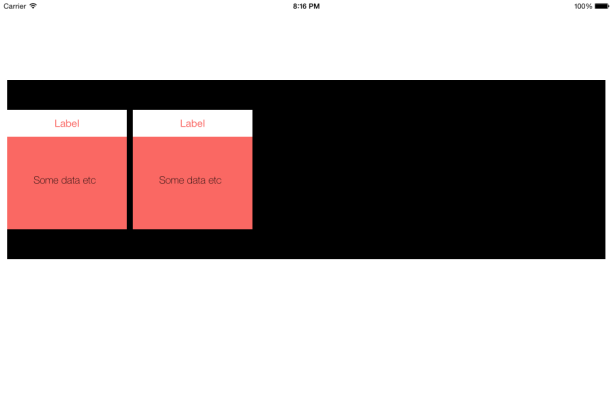
Now build and run the project. You should see something similar to the below. If not, put a breakpoint in the delegate methods and make sure they are called and the delegate is setup correctly.

Screen Shot 2015-05-04 at 20.16.07

Now lets add another method to centre the 3 UICollectionViewCells. You will notice I have hardcoded in all of the width values but that is just to make this more understandable, it should be quite simple to get the values at run time programmatically. So you should now adapt your ViewController to look like the below.

#import "ViewController.h"

#define CELL_WIDTH 200
#define CELL_SPACING 10
#define COLLECTIONVIEW_WIDTH 1000

@implementation ViewController
{
	NSInteger _numberOfCells;
}

- (void)viewDidLoad
{
	[super viewDidLoad];
	_numberOfCells = 3;
}

- (NSInteger)collectionView:(UICollectionView *)collectionView numberOfItemsInSection:(NSInteger)section
{

	return _numberOfCells;
}

-(UICollectionViewCell*)collectionView:(UICollectionView *)collectionView cellForItemAtIndexPath:(NSIndexPath *)indexPath
{

	UICollectionViewCell *cell = (UICollectionViewCell*)[collectionView dequeueReusableCellWithReuseIdentifier:@"Cell" forIndexPath:indexPath];

	return cell;
}

- (UIEdgeInsets)collectionView:(UICollectionView *)collectionView layout:(UICollectionViewLayout*)collectionViewLayout insetForSectionAtIndex:(NSInteger)section
{
	NSInteger viewWidth = COLLECTIONVIEW_WIDTH;
	NSInteger totalCellWidth = CELL_WIDTH * _numberOfCells;
	NSInteger totalSpacingWidth = CELL_SPACING * (_numberOfCells -1);

	NSInteger leftInset = (viewWidth - (totalCellWidth + totalSpacingWidth)) / 2;
	NSInteger rightInset = leftInset;

	return UIEdgeInsetsMake(0, leftInset, 0, rightInset);
}

@end

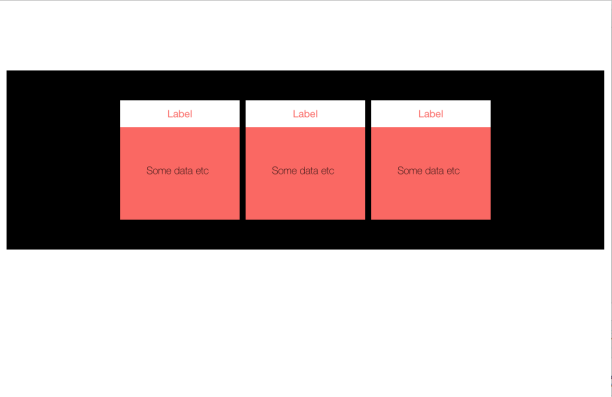
There is no reason to use that many lines of code or to have both a left and right inset other than simplicity for this demonstration. That method can be reduced to a few lines at most. Run the project again and you should have a centred UICollectionView like below.

Screen Shot 2015-05-05 at 20.26.22